A Practical Guide to Mastering Office 365 Planner
Discover how to use Office 365 Planner to organize tasks, boost team collaboration, and streamline your project workflows with our complete, practical guide.
Calendar0 Team
December 15, 2025

Ever felt like your team's project plan is scattered across a dozen emails, a few random spreadsheets, and a mountain of sticky notes? That’s exactly the chaos Microsoft Office 365 Planner is built to fix. Think of it as a clean, digital whiteboard where all those scattered to-dos finally come together in one organised space.
What Is Office 365 Planner and Why Does It Matter?
At its core, Planner is a visual, Kanban-style task management tool that lives right inside the Microsoft 365 world you and your team already use every day. It’s not trying to be a heavyweight project management monster like MS Project. Instead, it hits that perfect sweet spot between a basic to-do list and an overly complex system, making it ideal for the vast majority of team projects.
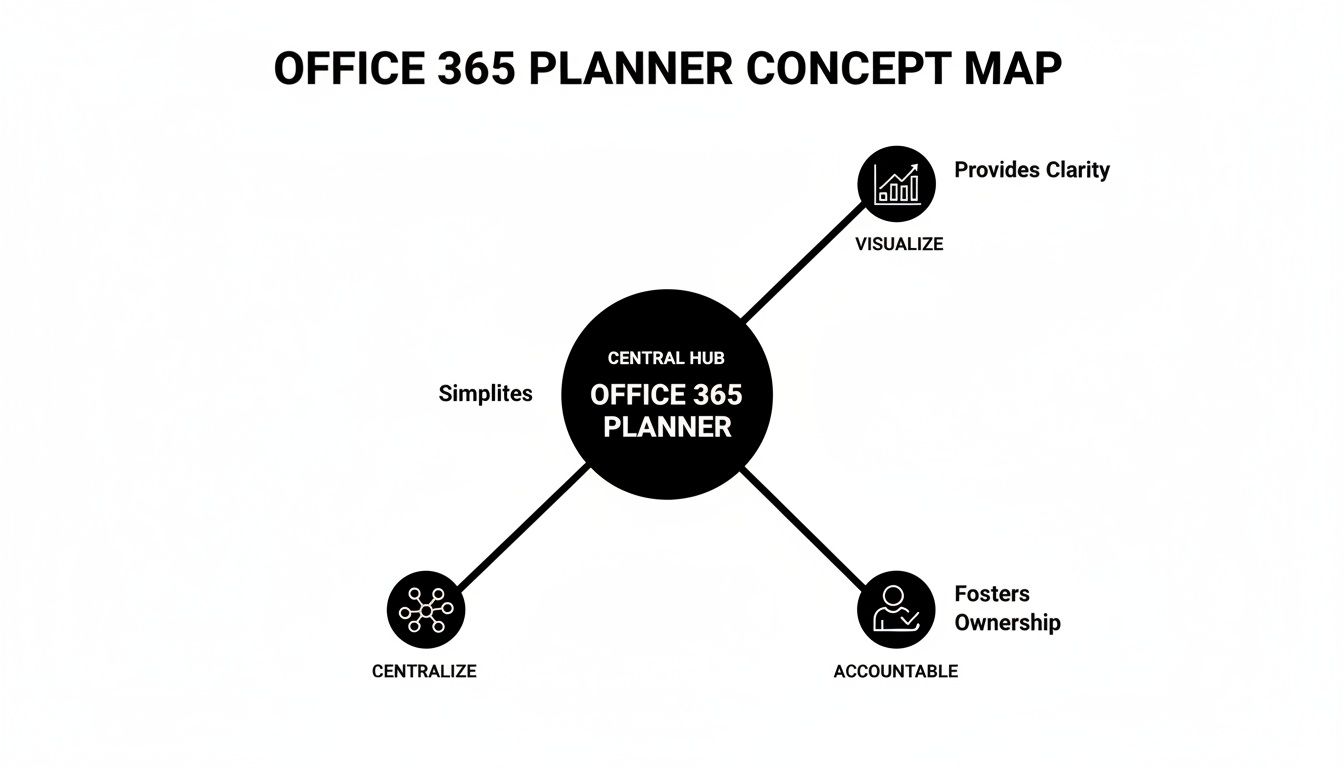
The whole point is to bring clarity and focus. It centralises every task, makes progress visible to everyone at a glance, and creates clear accountability without a steep learning curve.
Solving Key Teamwork Problems
Planner is brilliant because it directly tackles the classic headaches that slow teams down, especially when everyone isn't in the same room. It creates a single source of truth for who is doing what, and by when. No more confusion, no more wasted effort on duplicate work.
Here are the common pain points it helps solve:
- Lack of Transparency: Everyone sees the whole project board. You instantly know how your tasks fit into the bigger picture, which is a massive motivator.
- Poor Accountability: When a task has a name and a due date right next to it, there’s no room for ambiguity. Everyone knows what they're responsible for.
- Fragmented Communication: Forget digging through endless email chains. Task-specific comments keep all conversations, files, and updates organised in one place.
- Difficulty Tracking Progress: The visual 'Charts' view is a simple, at-a-glance dashboard. It lets team leads spot bottlenecks and potential delays before they become real problems.
At its heart, Office 365 Planner is designed to make teamwork simpler and more visible. By providing a shared space for tasks, it removes the friction that slows projects down, allowing teams to focus on execution rather than administration.
It's clear this approach works. In Germany, for instance, the Office 365 management software market has grown significantly, with large enterprises making up over 60% of the market. And it’s not just big companies. After the shift to remote work, German SMEs using Planner's bucket-based system reported a 25% jump in project completion rates. That’s a serious impact. You can find more stats on the German software market over at datainsightsmarket.com.
Of course, Planner is a fantastic tool, but it's not the only one out there. If you're exploring different ways of working, it's worth seeing how it compares against the best planning apps. This can give you some valuable context to make sure you’re picking the absolute best solution for your team's unique needs.
Navigating the Planner Workspace with Confidence
Jumping into a new tool can feel like trying to find your way around an unfamiliar city, but Office 365 Planner is designed more like a well-organised workshop. Let's walk through the layout so you can get your bearings and start managing tasks from day one.
Your main command centre is the Planner Hub. This gives you a bird's-eye view of every single plan you're a part of. Right beside it, you'll find the "My Tasks" view. Think of this as your personal to-do list for the day, pulling everything assigned to you from all your different plans into one simple, manageable spot.
Understanding Plans and How They Work
Every project or major initiative gets its own dedicated Plan. A Plan is basically a unique project room. Inside, you keep everything related to that specific job, which keeps projects like "Q3 Marketing Campaign" and "New Website Launch" from getting mixed up and causing chaos.
Inside each Plan, the real organisation happens with three key elements:
- Buckets: These are the columns you see on your project board. Most teams start with simple phases like 'To Do,' 'In Progress,' and 'Completed,' but you can customise them to match any workflow you have—think 'Ideation,' 'Content Creation,' and 'Final Review.'
- Cards: These are your individual tasks. Just like sticky notes on a whiteboard, each card represents one clear, actionable item, like "Draft blog post" or "Design social media graphics."
- Details: When you click on a card, it opens up a whole new level of information. This is where you can add sub-task checklists, set due dates, attach files, assign the task to someone, and leave notes.
This simple structure—Plan > Bucket > Card—is the secret sauce. It provides a logical way to break down even the most complex projects into pieces anyone can understand and tackle.
Seeing Your Workflow from Different Angles
Planner is more than just a list of tasks; it gives you a few different ways to look at your project. This flexibility is what helps you spot potential roadblocks before they turn into full-blown crises.
The default is the Board view, the classic Kanban-style layout with your Buckets and Cards. It’s perfect for watching a task move from start to finish.
If you need to see the data behind the work, the Charts view is your go-to. It's an instant dashboard with graphs showing task status, how work is spread across buckets, and who on the team might be overloaded. It's incredibly useful for spotting bottlenecks without having to dig through spreadsheets.
Being able to switch between a visual workflow (Board), progress analysis (Charts), and a deadline overview (Schedule) gives teams a complete picture of their projects without needing separate, complicated reporting tools.
Finally, you have the Schedule view. This lays out all your tasks with due dates on a calendar, giving you a clear timeline of what's coming up. This view is a lifesaver for seeing when deadlines are piling up and making sure the team's workload is balanced over the coming weeks.
By getting comfortable with these different views, you'll move beyond just making lists and start truly managing your team's workflow with real confidence.
Right, so you've got your plan set up with a few buckets. Now what? This is where Office 365 Planner really starts to shine, moving beyond a simple to-do list and becoming the engine room for your team's productivity. It’s all about using its core features to cut through the noise and keep everyone on the same page.
This isn’t just about making tasks and tossing them at people. It's about using the tools inside each task to build a clear picture of what needs doing, turning vague ideas into concrete, actionable steps.
Break Down Big Tasks With Checklists
Let's be honest, a task like "Organise Annual Client Webinar" is pretty intimidating. It’s vague. It’s huge. But this is exactly what the Checklist feature is for. It lets you break that monster task down into small, manageable bites.
Suddenly, "Organise Annual Client Webinar" becomes:
- Finalise speaker list and topics
- Create promotional graphics for social media
- Set up registration landing page
- Draft and schedule invitation emails
- Prepare presentation slides
Each item gets ticked off as it’s done, giving everyone a clear, visual hit of progress. It’s a simple way to make sure nothing gets missed and gives your team that satisfying feeling of moving forward.
See What Matters With Labels
As your plan grows, it can start to look like a chaotic mess of cards. This is where Labels save the day. Think of them as colour-coded sticky notes that give you instant context without having to click on a single thing.
You can create up to 25 different coloured labels for each plan, which is more than enough for most teams. For example, a marketing team could set up labels for:
- Priority: Red for 'Urgent', Yellow for 'High Priority', Green for 'Normal'.
- Workstream: Blue for 'Social Media', Purple for 'Blog Content', Orange for 'Email Campaign'.
- Status: Pink for 'Blocked', Grey for 'On Hold'.
With these in place, anyone can filter the board to see just the 'Urgent' tasks or everything related to the 'Blog Content' stream. It’s a beautifully simple system for cutting through the clutter and focusing on what needs to be done right now.
Keep Conversations in One Place With Comments
Trawling through email chains to find that one piece of feedback is a soul-destroying waste of time. Planner kills this problem with its Comments section, built right into every task card. It keeps every conversation, question, and update attached to the work it’s actually about.
If a designer needs clarity on a brief, they can ask right on the "Create promotional graphics" card. When the project manager shares an update, it’s recorded where it belongs. This creates a single, chronological history of the task that anyone can refer back to.
By keeping task-related conversations within the task itself, Office 365 Planner eliminates communication silos and creates a single, reliable source of truth for project progress. No more searching through inboxes; the full story is always right there.
Get a High-Level Overview With the Charts View
You can't manage what you can't see. The Charts view is Planner’s built-in dashboard that gives you a real-time, visual snapshot of your project's health. No manual report-building required.
This view breaks down all the crucial data, showing you:
- Status Chart: A quick pie chart of how many tasks are Not Started, In Progress, Late, or Completed.
- Bucket Chart: A bar graph showing task distribution across your buckets, instantly highlighting any bottlenecks.
- Priority Chart: A simple breakdown of tasks by their priority level.
- Members Chart: An overview of who’s working on what. This is gold for spotting who’s overloaded and who has capacity. For a deeper dive, understanding effective resource allocation in project management principles can really level up how you use this view.
Dipping into the Charts view regularly helps project leads spot trouble before it starts, rebalance workloads, and keep the whole project humming along smoothly.
Weaving Planner Into Your Daily Microsoft 365 Workflow
The real magic of Office 365 Planner isn’t just in its features, but in how it disappears into the background of your daily Microsoft 365 routine. Planner was never meant to be another isolated island for tasks. Think of it more as a central hub, connecting project management directly to the tools your team already uses every single day.
This is what turns Planner from a simple to-do list into a genuine collaborative engine. When your tasks, conversations, and files all live in the same place, the constant friction of app-switching vanishes. Your team can finally stay in the flow and keep their momentum.
Bring Your Plan Directly Into Microsoft Teams
Let’s be honest, for most of us, Microsoft Teams is where work happens. Planner gets this, which is why you can embed an entire plan as a tab right inside any Teams channel. This is a total game-changer for project work.
Picture a marketing team prepping a new product launch. Instead of chatting in Teams and then jumping over to Planner to update tasks, they do it all in one spot.
- A Truly Unified Workspace: The project board sits right next to channel conversations, SharePoint files, and meeting notes. No more hunting around.
- Collaboration in Context: Team members can talk about a task in the chat and immediately drag its card on the Planner board to ‘Done’ without ever leaving the Teams window.
- Effortless Visibility: Everyone in the channel can see the project's progress at a glance. It creates a natural sense of shared ownership and keeps everyone accountable.
This tight integration makes project management feel less like a chore and more like a natural part of the team's conversation. Just make sure you’ve got your security sorted; it’s a good idea to consider how Microsoft 365 Conditional Access policies might affect how your team accesses these integrated tools.
Sync Planner Deadlines With Your Outlook Calendar
A scattered view of your commitments is a surefire way to miss deadlines. Planner tackles this head-on by letting you sync your plan’s schedule directly with your Outlook Calendar. In just a few clicks, you can publish the plan's calendar feed, and every task with a due date pops up right in Outlook.
Suddenly, you have a single, unified view of your day. You can see your meetings right alongside your project deadlines, making it so much easier to prioritise and manage your time. This simple connection helps kill the classic problem of overcommitting just because you forgot about that one crucial project task.
When you see project tasks next to your calendar events, you stop just managing tasks and start actually managing your time. It’s the clarity you need to make smarter calls on what to focus on today and this week.
Unify Your Personal Tasks With Microsoft To Do
Planner is fantastic for team projects, but what about all the little things that are just for you? This is where the integration with Microsoft To Do is absolutely brilliant. Any task assigned to you, from any Planner board, automatically shows up in your "Assigned to me" list inside the To Do app.
This means you get one consolidated list of everything on your plate, mixing personal reminders from To Do with your assigned project work from Planner. For any busy professional, this is gold. You don't have to check five different places to figure out what you need to do next; it's all organised for you, ready to go.
And this integrated approach is catching on. In Germany, for example, enterprises are really leaning into Microsoft 365 Planner, with usage jumping 35% in organisations using AI tools like Copilot. Among the 400,000+ German companies on Microsoft 365, Planner now accounts for 28% of all daily task assignments in mid-sized businesses, proving it’s becoming a core part of the modern workflow.
Applying Planner to Real-World Business Scenarios
All the theory is great, but how does an Office 365 Planner board actually hold up in the middle of a chaotic workday? To really get its value, you need to see it in action. Let’s look at how different teams can take Planner’s simple framework and bend it to solve their own unique challenges.
This is where Planner stops being just another app and becomes a genuinely flexible tool for getting things done. Its real strength isn't in a rigid set of features, but in how easily it moulds to the way your team actually works.
A Marketing Team’s Product Launch
Picture a marketing team scrambling to get a major product launch out the door. It's a whirlwind of content creation, social media scheduling, and last-minute logistics. Instead of drowning in a messy spreadsheet, they spin up a dedicated Plan.
Their board might look something like this:
- Bucket 1: Content Creation: This column is home to tasks like "Draft announcement blog post," "Produce launch video," and "Design email newsletter."
- Bucket 2: Social Media Campaign: Here, you’ll find cards for "Schedule LinkedIn posts," "Create Instagram story series," and "Monitor brand mentions."
- Bucket 3: Launch Day Prep: This final bucket is for the mission-critical, day-of tasks, like "Publish blog post at 9 AM" and "Go live with webinar."
They use labels to tag priority (Urgent, High, Normal) and content type (Video, Blog, Social). By dropping this Plan right into a tab in their Microsoft Teams channel, all the conversation happens directly alongside the work. It becomes a seamless command centre for the entire launch. For teams coming from other project tools, it's interesting to compare the workflow, like in this look at the Asana desktop app experience.
An IT Team’s Helpdesk Board
An IT department can easily turn a Planner board into a simple but effective helpdesk for tracking support tickets. When a new request comes in from an employee, a team member creates a new task card.
The buckets here represent the ticket's journey from start to finish:
- New Requests: All incoming tickets land here first.
- In Progress: A technician assigns the ticket to themselves and drags it here.
- Awaiting User Response: The card moves here if the tech needs more info from the user.
- Resolved: Once the job is done, the card is moved to this final column.
This visual, drag-and-drop system provides instant clarity on ticket status and who's working on what. It’s far more intuitive than a chaotic shared inbox and gives the whole team visibility into the workload.
Labels can categorise tickets by issue type—like 'Hardware', 'Software', or 'Network'—or by urgency. This allows the team lead to quickly filter the board, spot recurring problems, or jump on high-priority issues that need immediate attention.
An HR Department’s Onboarding Process
Onboarding a new employee involves a ton of moving parts. An HR team can create a template Plan for each new hire, guaranteeing a consistent and thorough experience every single time. Each task card represents a crucial step in the process, assigned to the right person—whether they're in HR, IT, or are the new hire's direct manager.
This kind of structured approach is incredibly effective across industries. In Germany's massive €400B construction sector, 75% of companies have adopted Microsoft 365 Planner. It's now used to manage 40% of their project buckets, helping to slash project delays by a remarkable 30%. You can find more insights on Microsoft 365 adoption in the UK on sqmagazine.co.uk.
Advanced Strategies and Practical Workarounds
Once you’re past the basics of setting up boards and assigning tasks in Office 365 Planner, it’s time to get a little more sophisticated. This is where you move beyond simply creating tasks and start building systems that keep your plans organised, clear, and effective—even when projects get messy.
It also means knowing where Planner falls short and having a few clever tricks up your sleeve to work around its limitations. With a few smart practices, you can plug those gaps and build a workflow that feels custom-made for your team.
Establish Clear Naming Conventions
Let’s be honest, the Planner Hub can get cluttered fast. As your team starts spinning up more plans, it can quickly turn into a confusing list of project names. The easiest fix is to agree on a clear naming convention from day one.
A simple prefix system works wonders:
- MKTG - Q3 Social Campaign: You know instantly it's a marketing plan.
- IT - Server Upgrade Project: No question, this belongs to the IT department.
- HR - New Hire Onboarding Template: Clearly marked as a reusable template for HR.
Apply this same thinking to your buckets. Ditch generic names like "To Do" for something more descriptive. Try action-oriented titles like "Awaiting Client Feedback" or "Ready for Final Review." It’s a tiny change that adds a massive amount of context at a glance.
Master Advanced Filtering with Labels
Labels are easily Planner’s most underrated feature. Most teams stop at using them for priority, but they can do so much more. Think of them as a flexible tagging system that lets you create custom, filtered views of your board—like mini-dashboards for specific workflows. You get up to 25 different coloured labels per plan, which is plenty to work with.
For instance, you can use labels to fake task dependencies, which Planner doesn't have natively. A red label could mean "Blocked," signalling that a task can't start until another is done. Team members can then filter the board to see only the unblocked tasks they can actually start working on.
By treating labels as a dynamic filtering system, you can create on-the-fly reports and views without needing any extra tools. It’s about using a simple feature to solve a complex organisational problem, giving your team immediate clarity on what to focus on next.
Practical Workarounds for Common Limitations
No tool is perfect, and Planner is no exception. But the good news is, most of its frustrating limitations have pretty straightforward workarounds.
1. No Native Task Dependencies: This is the big one. As mentioned, labels can help, but if you want something more automated, a simple Power Automate flow is your best friend. You can create a rule that automatically pings someone in Teams or Outlook the moment a prerequisite task is marked as "Completed."
2. Managing Recurring Tasks: Planner doesn't have a simple "repeat task" button. The easiest workaround? Create a "Templates" bucket inside your plan. Keep a master card for each recurring task (like "Generate Weekly Report"). Each week, just copy that card, pop in the new due date, and drag it into your "To Do" bucket. Of course, while you're organising your tasks, using a secure task manager is essential for protecting sensitive project details.
3. Archiving Completed Plans: Your Planner Hub will eventually fill up with finished projects. While there’s no big "Archive" button, the best practice is to simply remove all members from the plan except for the owner. This makes it disappear from everyone else's Hub view, effectively archiving it without deleting any data. For extra brownie points, you can add the plan to a dedicated "Archived Projects" Microsoft 365 Group to keep things tidy.
Office 365 Planner: Your Questions Answered
Getting your hands dirty with a new tool always brings up a few questions. To help you get up and running with Office 365 Planner, I've pulled together answers to the most common queries I hear from teams.
Can I Add External Users to an Office 365 Planner Plan?
Yes, you absolutely can. Planner lets you add people from outside your organisation using the guest access feature that’s part of Microsoft 365 Groups. When you invite an external user to the group connected to your plan, they’ll get an email invitation.
Once they accept, they can see the plan, have tasks assigned to them, and contribute just like anyone else on the team. Just keep in mind that your company's administrator has to have guest access enabled for this to work, and guests might have slightly limited permissions.
What Is the Difference Between Planner and Microsoft Project?
This is a big one, but the two tools are built for completely different jobs. Think of Planner as your lightweight, visual, and highly collaborative tool for day-to-day projects. Its simple Kanban board is intuitive enough for anyone to jump in and start contributing immediately.
Microsoft Project, on the other hand, is a beast. It’s a seriously powerful and complex solution designed for certified project managers running large-scale, long-term initiatives. It’s packed with advanced features like in-depth resource management, budgeting, and complex Gantt charts that would be total overkill for most team tasks.
How Can I See All My Assigned Tasks in One Place?
Planner has a couple of great ways to pull your entire workload together. The first is built right into the app: the "My Tasks" view. It automatically collects every single task assigned to you from every plan you’re a part of, neatly sorting them by status.
For an even slicker setup, the Microsoft To Do app syncs perfectly with Planner. It pulls all your Planner tasks into a dedicated "Assigned to me" list, letting you see your personal to-dos and team assignments all in one place.
The real magic of Planner's task aggregation is how it cuts through the noise. By centralising your assignments, it gives you one clear, actionable list to focus on. No more bouncing between different project boards just to figure out what’s on your plate.
Is It Possible to Create Task Dependencies in Planner?
Out of the box, Planner doesn't have a direct feature for creating task dependencies—like preventing Task B from starting until Task A is done. But there are some simple and effective workarounds that most teams rely on.
One common trick is to use a checklist inside a task card to list out all the prerequisite items that need to be finished first. If you want something a bit more automated, you can use Microsoft Power Automate to build a simple flow that pings a user as soon as a preceding task is marked complete.
Stop wasting time on calendar admin and start focusing on what matters. Calendar0 uses AI to schedule your meetings at the speed of thought, integrating all your calendars into one seamless view. Try it for free at https://www.calendar0.app.